

Tree pruning done right reduces storm damage, improves canopy health, and boosts fruit and shade production. This guide gives species-aware techniques, step-by-step cuts like the three-cut and pruning collar methods, tool care and sanitation practices, and seasonal timing so you can handle small jobs safely and help trees thrive. It also lays out clear limits and decision rules for when to call Mr Tree Inc or a certified arborist for hazardous or complex work.
Why prune: goals and expected outcomes
tree pruning produces four distinct outcomes you should choose between — health, structure, safety, or production — because each objective requires different cuts and creates different short- and long-term results. Pick your goal first; the wrong objective drives the wrong technique and predictable failures.
- Health: remove deadwood, improve air flow and light penetration to reduce disease pressure and speed recovery after stress. Expect visibly cleaner canopy and fewer dead branches in one season, with improved leaf density the following year.
- Structure: correct weak joints, remove competing leaders, and set scaffold branches to reduce future failure risk. This is an investment — early formative work prevents costly cabling or major corrective cuts later.
- Safety: remove immediate hazards such as cracked limbs or branches over structures. Safety pruning removes risk quickly but often results in larger wounds that require proper cutting technique and follow-up inspections.
- Production: for fruit trees, use renewal and selective thinning to shift energy into fruiting wood. You can see yield and fruit quality improvements within 1 to 2 seasons when light and bud distribution are corrected.
Practical trade-off: aggressive aesthetic cuts like heading or heavy topping deliver an instant visual fix but create vigorous, weakly attached regrowth and long-term decay. If your priority is appearance, accept the maintenance cost that follows; if your priority is long-term structure, choose selective thinning and formative training instead.
Concrete Example: On a sugar maple we removed two crossing branches with included bark and redistributed crown weight by shortening a dominant limb at a lateral junction. The immediate outcome was reduced bark-splitting risk and, within two growing seasons, a more stable scaffold for snow and wind. Concrete Example: After a summer storm we removed deadwood from a white oak and staged a follow-up inspection for decay progression; the immediate safety hazard was eliminated, but the tree still required monitoring because large wound exposure increases future failure risk.
What success looks like in practice: measurable outcomes are time-based, not instantaneous. Expect reduced limb failures and clearer sightlines after the first season, improved canopy density and fruit set in the next 1 to 2 seasons, and lower long-term maintenance costs if you invest in early structural pruning. For disease-related objectives, pair pruning with diagnosis and targeted treatment — pruning alone rarely fixes an infection.
Real-world judgment: homeowners often treat tree pruning as cosmetic and select the fastest cut. That creates repeat work and structural problems. Match the technique to the objective: use thinning and collar-preserving cuts for health and structure, reduction cuts for clearance, and renewal pruning for production. When you cannot achieve the objective without large wounds, get a professional assessment — see Tree Trimming & Pruning for scope and examples.
Timing and seasonal strategy by species and climate
Key point: the right time to perform tree pruning is determined first by species biology and second by local climate, not by convenience. When you cut changes which buds you remove, how fast wounds close, and the disease vectors you expose the tree to.
Seasonal calendar at a glance for temperate landscapes
| Month | Cool/Temperate climates (USDA ~4–6) | Warm/Coastal or Subtropical climates (USDA ~7+) |
|---|---|---|
| January | Dormant structural pruning for most shade trees; good window for oaks outside high-risk regions | Selective pruning on non-flowering trees; avoid heavy cuts on stress-prone species |
| February | Finish dormant pruning; shape young trees and remove deadwood | Late-winter pruning recommended for live oaks before spring heat |
| March | Final dormant window; avoid pruning spring bloomers that are about to open | Early-season pruning if disease vectors low; watch for early sap flow |
| April | Avoid pruning oaks in regions with oak wilt vector activity; prune spring-flowering trees after bloom | Delay oak cuts in high-risk areas; fruit tree thinning after bloom |
| May | Summer growth begins; limited pruning for shaping and deadwood only | Active growth; use light pruning to slow vigorous shoots |
| June | Summer pruning to reduce vigor and improve light; avoid major structural cuts | Good window for corrective pruning on warm-climate ornamentals |
| July | Avoid heavy pruning in heat stress conditions; remove hazardous limbs | Prune sparingly; plan major cuts for cooler months |
| August | Late-summer pruning only for necessary clearance and deadwood removal | Watch for drought stress; defer large wounds until growth slows |
| September | Begin assessing trees for fall dormant work; remove safety hazards | Early fall pruning for maintenance; avoid on species that set buds for next year |
| October | Light pruning; prep for winter; avoid heavy removal before hard freezes | Excellent time for structural corrections in many warm areas |
| November | Dormant season returns; good for many deciduous species in cold climates | Late-season pruning for shape and site clearance |
| December | Dormant pruning continues; smaller wounds and slower sap flow | Manage ornamentals and finish corrective cuts before major winter storms |
Practical trade-off: winter pruning reduces insect activity and immediate stress but often produces slower wound closure and more sap bleeding on species like maple and birch. Summer pruning encourages faster compartmentalization and limits regrowth in vigorous trees, but it can remove flower or fruiting buds and increase sun exposure on previously shaded bark.
Species-specific judgment: maples and birches bleed when pruned in early spring; the bleeding is cosmetic for healthy trees and not fatal, so timing is a matter of tolerance. Oaks require stricter regional timing because oak wilt and similar diseases are spread by bark-feeding beetles that are active in warmer months; in many central and eastern US locations you should schedule major oak cuts in late fall or deep winter when vectors are inactive.
Concrete Example: a homeowner in USDA zone 6 faced a cracked limb on a mature sugar maple in late March. We scheduled the structural cut for late February the following year to avoid active sap flow, used the three-cut method, and staged a minor summer pruning the next season to remove water sprouts. The staged approach reduced root and crown stress while keeping the tree structurally sound.
Another use case: for apples and pears, do primary structural and renewal pruning in late winter to position scaffold branches, then do light summer pruning in June to remove vigorous vertical shoots that steal energy from fruit buds. That combination preserves fruiting wood while controlling vigor.
Operational limitation: municipal permits and utility regulations can restrict pruning windows for street trees and work near powerlines. Always verify local rules before scheduling major cuts; failing to do so can lead to fines or forced rework. For commercial or large residential jobs, build the timing constraint into the project estimate up front.
Takeaway: start with species and local climate, then pick the minimal window that meets your objective. If the tree is large, near structures, or a species with known disease vectors, schedule work with a professional who can align timing with treatment and risk mitigation; see Tree Trimming & Pruning for service options.
Pruning cuts and techniques every homeowner must master
Practical point: effective tree pruning is decided by cut placement and target, not by brute force. The right incision preserves living collar tissue, redirects growth to a strong lateral, and controls wound size so the tree can compartmentalize.
Three-cut method for large limbs
- Undercut first: make a shallow cut on the underside 12 to 18 inches out from the trunk (distance scales with limb size) to stop bark from ripping when the limb falls.
- Relief cut second: a top-side cut a few inches beyond the undercut removes the limb weight cleanly. This prevents bark tear back toward the trunk.
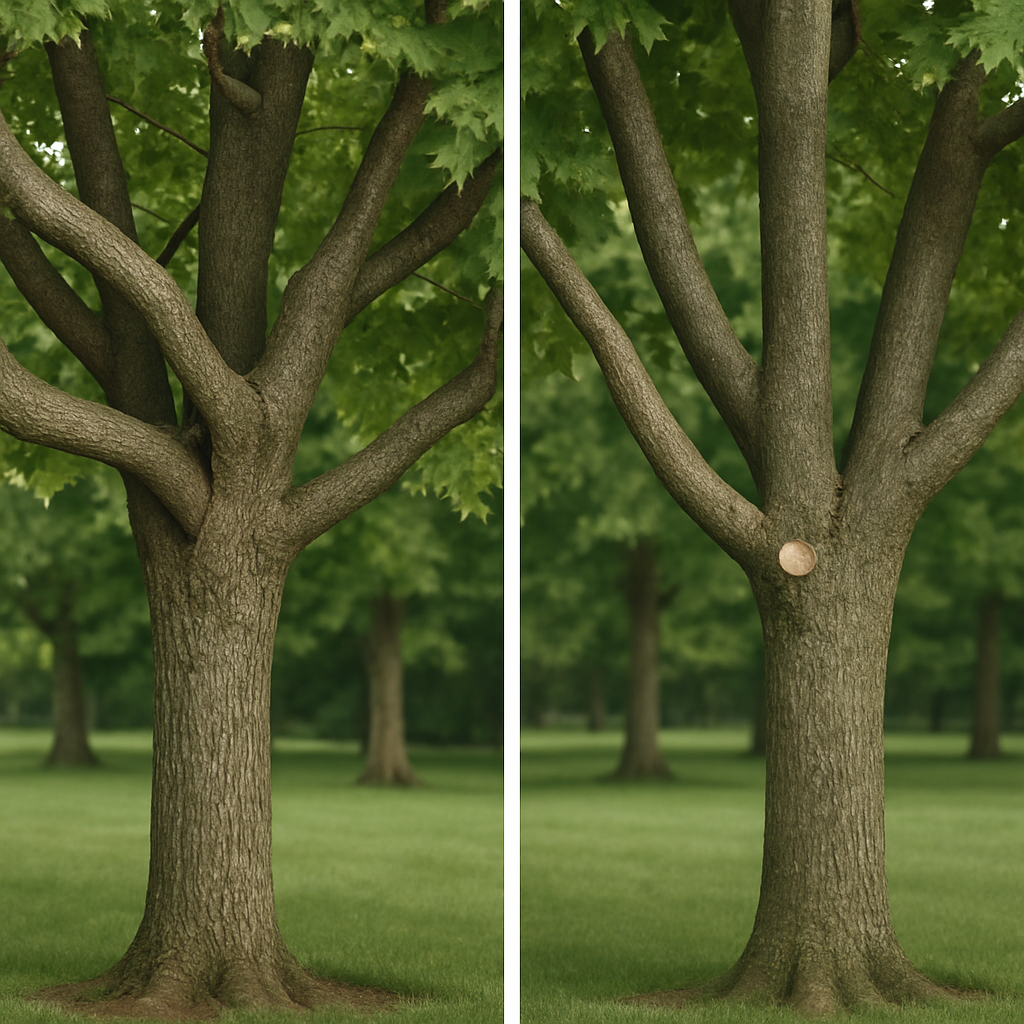
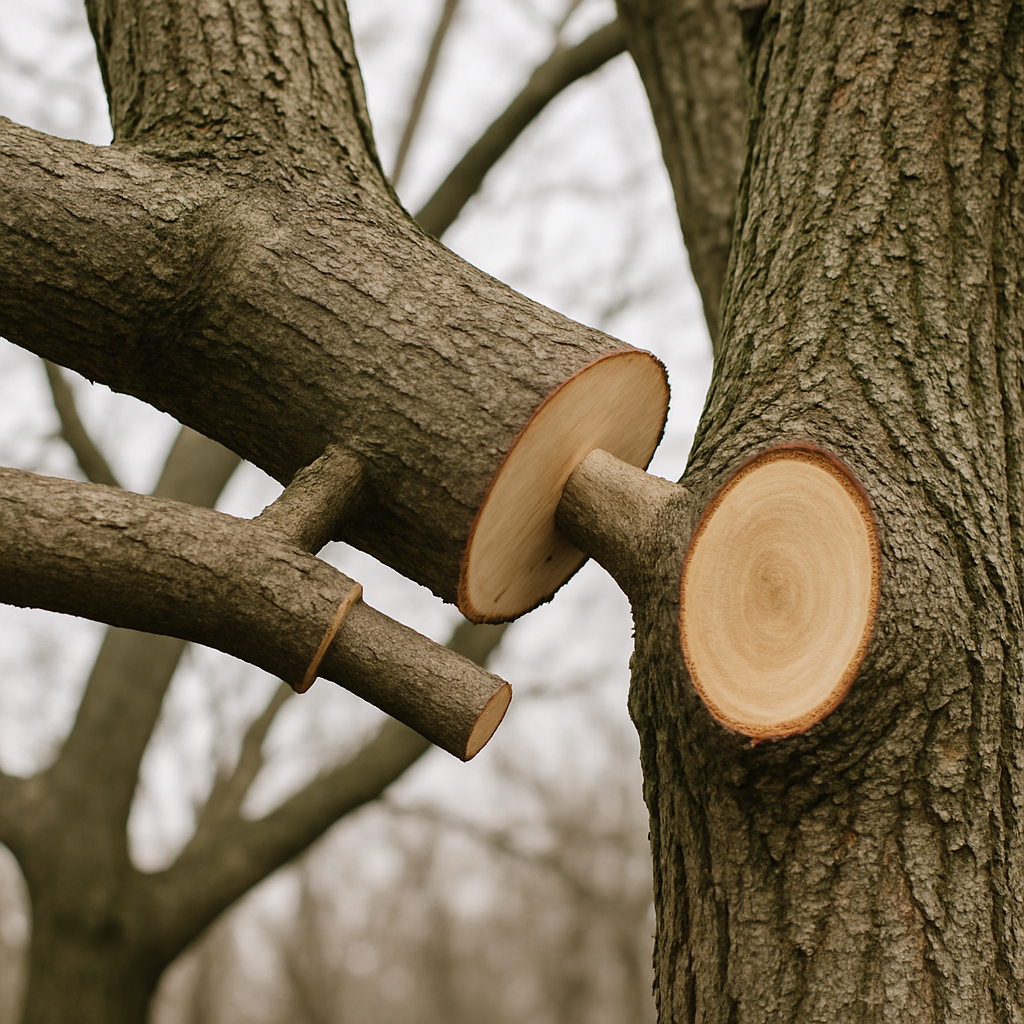
- Finish cut at the collar: remove the remaining stub by cutting just outside the branch collar following its angle; do not cut the collar flush or leave a long stub.
Why it matters: bark tears cause larger wounds and longer decay pathways than a correctly placed three-cut sequence. That matters more on mature trees where wound size correlates with future failure risk.
Pruning collar cut and lateral selection
- Find the collar: the swollen ridge at the branch base where root and branch tissues overlap. Preserve that textured tissue.
- Cut outside the collar: angle the cut to follow collar lines; avoid cutting into trunk bark or flush-cutting into the collar.
- Use strong laterals: when shortening a leader, reduce to a lateral that is at least one-third the diameter of the cut stem and growing in the desired direction.
Trade-off to accept: choosing a lateral that is slightly smaller preserves branch strength but delays full canopy recovery. Picking a too-small lateral gives faster sight-line fixes but creates weak attachment and repeated maintenance.
Cuts you should know and when to use them
- Thinning cut: remove a branch at its origin to open the canopy and reduce wind sail; use when improving light and airflow is the goal.
- Reduction cut: shorten a branch back to a lateral to reduce length and load without leaving stubs; use instead of heading on large limbs.
- Heading cut: removes the tip of a branch and stimulates dense, vigorous regrowth; useful for hedges or topiary, not mature shade trees.
- Crown cleaning/raising: selectively remove deadwood or lower limbs for clearance, keeping cuts collar-preserving and conservative (under ~20 percent of live crown at once).
Common homeowner mistake: homeowners default to heading because it is fast and gratifying. In real landscapes that creates a cycle of weak, dense regrowth and repeated pruning. Prefer reduction to a strong lateral for long-term structure.
Concrete Example: on a mature silver maple with heavy end-weight, we performed reduction cuts back to laterals at least one-third the stem diameter, staged over two seasons. The tree lost less crown mass at once, maintained canopy density, and showed fewer storm-damaged limbs the following winter. Concrete Example: when training a young red oak, we removed competing leaders and kept the central leader intact, using collar-preserving cuts during the first three years to establish wide-angle scaffold branches.
Avoid topping. It creates large wounds, weak regrowth, and future hazard — reduction and selective thinning give a safer, longer-term result.
Takeaway: master the three-cut and collar-preserving reduction to make cuts that heal and hold. Next consideration: match these techniques to your species and timing choices before you prune, or consult a certified arborist when large limbs, cavities, or utilities are involved.
Tools, tool care, and sanitation for safe effective cuts
Start with sharp, correctly sized tools. A clean, well-sharpened cutting edge changes the job from damaging to surgical: cuts close faster, wounds are smaller, and the tree compartmentalizes more predictably. Tool choice and condition are the baseline safety and tree-health decision you control; everything else is technique.
Tool selection by cut size and practical trade-offs
| Cut diameter | Recommended tool | Maintenance cadence | Practical note |
|---|---|---|---|
| Under 3/8 inch | Bypass hand pruners (e.g., quality models with replaceable blades) | Sharpen monthly in season; wipe sap after each use | Best for live wood; anvil pruners tend to crush and are a risk for disease spread |
| 3/8 to 1.5 inches | Bypass loppers or ratchet loppers | Sharpen and adjust pivot weekly during heavy use | Leverage is important; keep blades aligned to avoid jagged cuts |
| 1.5 to 6 inches | Folding saws / fixed pruning saws (Silky, Bahco) | Clean teeth and oil after each day; file teeth as needed | Saws produce cleaner wounds on larger limbs than blunt tools |
| 6 inches and up | Chainsaws or pole saws (professionals: Stihl, Husqvarna) | Daily chain sharpening, bar and chain tension checks, fuel/oil management | Higher risk work; use only with proper PPE and training or hire an arborist |
Maintenance specifics matter. For bypass pruners, a 10 to 15 degree bevel gives a durable cutting edge; use a round file or whetstone for small blades and a mill file for larger lopper blades. Keep pivots lightly oiled, replace worn springs and nuts, and store tools dry to avoid corrosion. Dull blades force crushing cuts and enlarge wound area, which increases decay risk.
- PPE essentials: gloves with good grip, ANSI-rated eye protection, sturdy boots; add a helmet and hearing protection for chainsaw work
- Sap and pitch removal: remove sap with warm soapy water or citrus-based cleaners before disinfecting; abrasive scrubbing followed by oiling prevents corrosion
- Storage: hang tools off the ground, coat metal lightly with oil for seasonal storage, and keep a dedicated sharpening kit
Sanitation with judgement, not ritual. Routine pruning on healthy trees does not require obsessive sterilization between every cut. Disinfect tools between trees when you see cankers, ooze, lesions, or when working on different sites with suspect disease. Overuse of harsh chemicals shortens tool life and can be unnecessary; pick the right agent for the situation.
Practical protocol: for light precaution use 70 percent isopropyl alcohol sprayed on blades and wiped; for active infections use a freshly mixed 10 percent household bleach solution, leave on surfaces for 30 seconds, then rinse and oil the tool. Bleach corrodes metal and damages handles over time, so rinse thoroughly and re-lubricate after use. Replace disinfectant frequently; do not rely on a single bottle across weeks of work.
Concrete Example: a homeowner pruning crabapple and nearby apple trees identified fire blight on one specimen. The crew isolated the infected tree, disinfected tools with bleach between cuts on that tree, and then used alcohol on all other trees that day. That targeted protocol prevented obvious spread and avoided destroying equipment with continuous bleach exposure.
Common mistake and judgment call: many homeowners sanitize excessively when there is no disease risk, wasting time and damaging tools. Conversely, under-sanitizing when pathogens are present is what spreads infections. If you cannot identify visible disease signs or the species is high-risk (for example, oak wilt regions), err on the side of calling a professional for diagnosis and follow Tree Care Industry Association guidance or consult Mr Tree Inc Tree Trimming & Pruning.
Invest in two quality pruners and a good saw before cheaping out. Sharp, reliable tools reduce wound size and your long-term maintenance burden.
Training young trees for long-term structure
Start small, start early. Formative pruning in the first five years dictates how a tree carries wind and snow for decades, so your cuts should be conservative and intentional rather than cosmetic.
Five-year formative plan
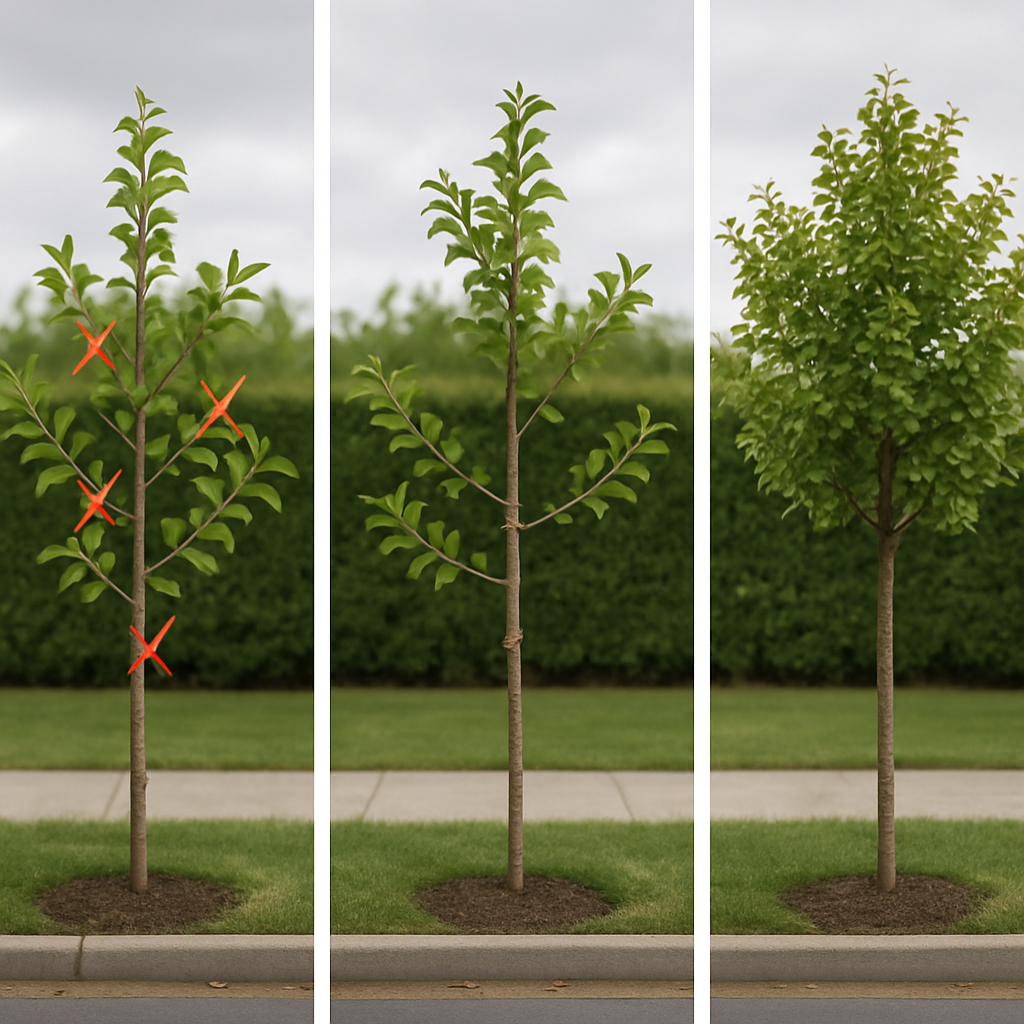
Year 1: choose the primary leader and remove obvious competing shoots. Keep one central stem for species that naturally develop a single leader and allow a little asymmetry as the trunk develops taper.
Years 2 to 3: establish 3 to 5 scaffold branches for small to medium trees or a denser scaffold for large-maturing species. Space scaffold branches vertically so they do not cluster – a practical rule is to leave several inches of trunk between scaffolds proportional to the tree size. Remove narrow-angle branches and any branches with included bark.
Years 4 to 5: refine branch size and spacing, remove vigorous water sprouts, and shorten long laterals back to well positioned buds or laterals. Make only small corrective cuts; large removals at this point should be staged over multiple seasons.
- Pick the architecture that fits the species: single leader for oaks and maples, multi-stem for many ornamentals and some crabapples.
- Prefer reduction to removal: shorten an overly long limb to a strong lateral rather than taking out a major scaffold unless the branch is defective.
- Preserve taper: avoid heavy topping, and avoid prolonged staking that prevents trunk thickening and weakens root anchorage.
Practical trade-off: investing time early reduces maintenance later. Heavy early pruning to force a perfect picture can slow trunk growth and require corrective work. Trade a tidy year zero for stronger structure in years five and ten.
Concrete Example: For a newly planted sugar maple we left a single leader, selected three scaffold branches at roughly equal vertical intervals on the lower trunk, removed two competing codominant stems in year one, and shortened other laterals to favor the chosen scaffolds. After three seasons the tree had a clear trunk, good taper, and scaffold angles that reduced the need for corrective pruning later.
When not to DIY: if you find multiple co-dominant leaders with included bark, or the scaffold selection requires removing branches larger than one inch near the trunk, call an arborist. These are the kinds of structural decisions that, if handled poorly, increase failure risk and long-term costs. See Arborist Services and Consulting when in doubt.
Addressing disease, pests, and decay when pruning
Disease and pests change the decision from how to cut to whether you cut at all. A wrong cut can spread pathogens, turn a manageable infection into a catastrophic failure, or expose a hidden cavity that destabilizes the tree. Treat diagnosis as part of the pruning job—not an optional afterthought.
Diagnose first, cut second
Look for external indicators before you pick up a saw: fungal conks or brackets, wet or discolored wood, cambial bleeding, sawdust or frass at branch unions, and abnormal canopy thinning localized to one side. Use simple field checks: sounding with a rubber mallet, probing suspect cavities with a long screwdriver, and photographing symptoms for comparison over time. Be realistic about limits: many decay pockets are larger than their external signs — advanced evaluation (increment borer, resistograph, or a professional decay assessment) is often the only way to know whether removal, cabling, or monitoring is the right choice.
Practical trade-off: removing an infected limb reduces inoculum and improves safety but creates a fresh wound and can leave the parent stem with weakened wood. Staging cuts and confirming internal condition first reduces the chance you will remove too much structural material or, conversely, fail to remove what’s unsafe.
Pruning technique when infection or decay is present
When you do remove infected wood, cut back to visibly healthy tissue and preserve the branch collar whenever possible. Avoid leaving long stubs or cutting into the collar itself; both increase the area for decay to spread. Do not rely on wound paints — they do not speed healing and can trap moisture against the wood. Instead, keep cuts clean, tidy, and limited to the minimum necessary to reach sound tissue.
If you encounter large cavities or fruiting bodies indicating root or butt rot, stop work and get a professional assessment. Sometimes cabling and bracing can stabilize a tree while a management plan is developed; other times removal is the safer, more economical decision. The correct choice depends on internal decay extent, nearby targets, and the tree's landscape value.
Concrete example: A neighborhood oak with shelf fungi at the lower bole looked superficially salvageable. Mr Tree Inc performed sounding and took a small core sample for lab analysis; the test showed extensive heartwood decay. We staged the operation: immediate limb removal for public safety, followed by a scheduled full removal because the trunk integrity was compromised. That avoided an emergency limb drop into a driveway and eliminated repeated temporary fixes.
Pests interact with pruning in two important ways. First, fresh wounds attract some bark-feeding insects and wood-borers; time major cuts outside peak adult flight windows when possible. Second, pruning can reduce vigor and make trees more susceptible to secondary pests unless you limit wound size and avoid removing excessive live crown. For species and timing guidance consult Penn State Extension or schedule a targeted treatment plan through Pest and Disease Management.
Handle and dispose of infected material deliberately. Do not chip or compost severely infected wood on site — many pathogens survive chipping and spread from the resulting mulch. Bag or haul infected material away per local rules, or follow extension recommendations for burning or municipal disposal. Leaving infected debris in place is a common and avoidable vector for reinfection.
If you cannot confirm that the cut will remove all unsafe, decayed wood, pause the job and call for a professional decay assessment. Quick fixes often become larger liabilities.
Safety, limits, and when to hire a professional
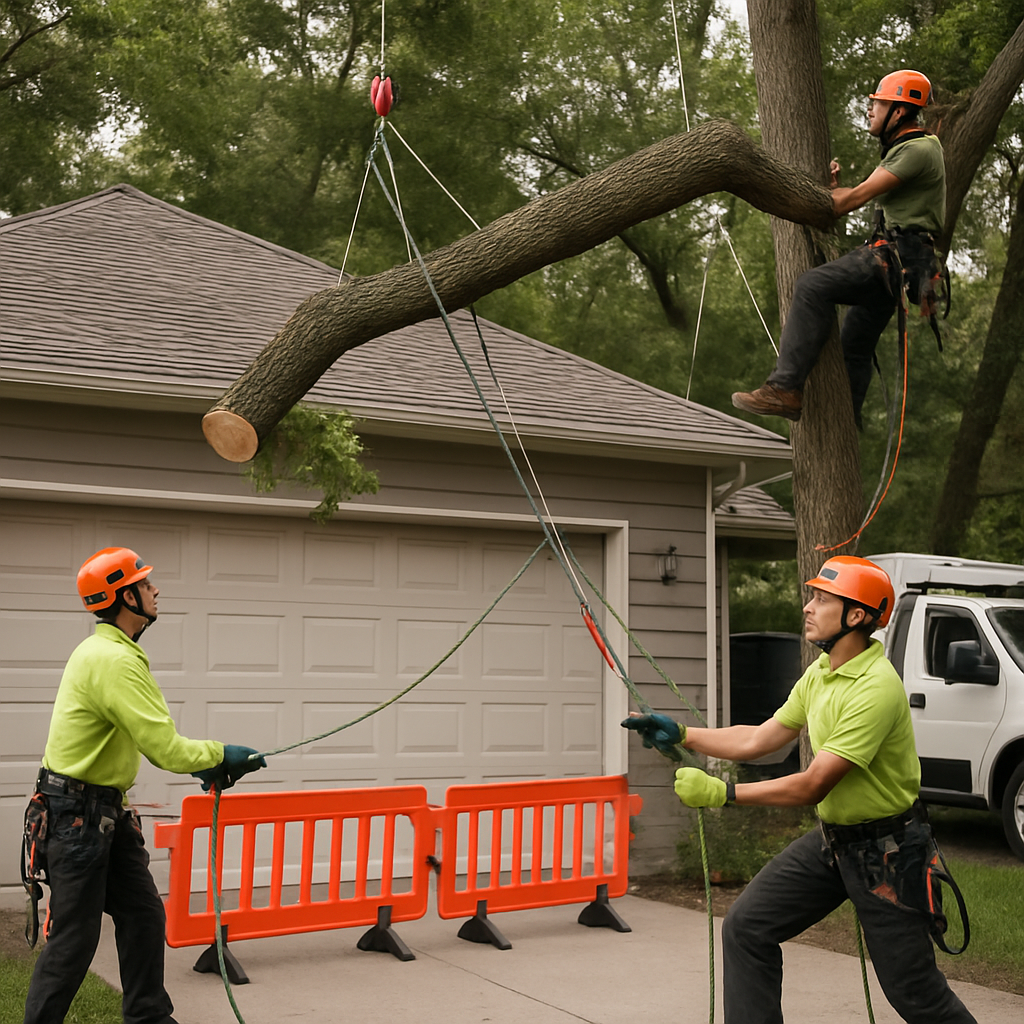
Immediate rule: stop and call a professional when the work creates a hazard you cannot control from the ground. Heights, falling paths over roofs or cars, large-diameter cuts, trunk cavities, and anything near powerlines are not DIY problems—those conditions change the job into a rigging, engineering, and liability exercise.
Practical trade-off: saving on labor by doing risky cuts yourself often costs more later. Improper limb drops damage roofs, vehicles, and underground utilities; a poorly executed large cut can open a tree to decay or trigger a progressive structural failure that requires full removal. If the math is remove-now versus possibly remove-later, include potential property repair and lost-equity costs, not just the hourly chainsaw savings.
On-site quick assessment
How to decide in 60 seconds: use this flow to triage work before grabbing tools.
- Map the drop zone: identify all targets under and near the branch (people, cars, fences, structures). If anything of value is in the potential fall path, hire a professional.
- Measure exposure: branches over 4 inches in diameter or limbs whose fall path crosses a structure should be considered high risk and require rigging or aerial work.
- Check access and height: if the cut is above shoulder height while standing on a ladder, or requires you to lean over a roofline, stop and call an arborist.
- Look for internal signs: large cavities, shelf fungi, or significant trunk decay are red flags—these require a diagnostic assessment before any major pruning.
- Regulations and utilities: if the tree is adjacent to a street, easement, or within 10 feet of service lines, contact your utility or a licensed crew who coordinates permits and safe de-energizing.
Judgment call many homeowners miss: price shopping purely on the lowest bid invites shortcuts—uninsured crews, unpermitted work, or poor rigging. Real value is written scope, proof of insurance, and clear waste/disposal plans. Ask for a crew list and a brief description of the method they will use to lower large limbs.
Concrete example: a homeowner had a cracked 8-inch limb hanging over a garage. We performed a hazard assessment, staged the removal with rope-and-pulley rigging, and dropped the limb in sections to avoid roof impact. The work required a short street closure, a permit, and two crew members on the roof; the cost reflected those safety controls but prevented a likely insurance claim.
If you cannot control the drop path from the ground, do not attempt the cut.
Next consideration: when you call, send clear photos (wide shot and close-up of the defect), the tree species if known, and exact location. That lets an arborist triage risk and quote more accurately—saving time and avoiding an unnecessary site visit.
Seasonal pruning checklist and step-by-step DIY workflow
Start with an on-site decision, not a bucket of tools. For small jobs under about 2 inch cuts, a short seasonal checklist plus a disciplined workflow prevents common mistakes that create weak regrowth or hidden decay.
Seasonal pruning checklist
- Assess target and timing: confirm the tree species and seasonal window for pruning; consult TreesAreGood or local extension notes before cutting.
- Scan for risk indicators: look for fresh cracks, hanging deadwood, fungal fruiting bodies, or heavy included bark; if any are present pause and escalate.
- Park the fall path: clear people, vehicles, and valuables from the drop zone and set simple barriers for bystanders.
- Select tools by cut size: have bypass pruners for shoots, loppers for 1 to 2 inch branches, and a folding saw for larger limbs; check sharpness and pivot tension quickly.
- On-site sanitation plan: set a single small spray bottle of 70 percent isopropyl alcohol and disposable wipes for suspected infections; avoid continuous bleach use unless treating confirmed disease.
- PPE check: gloves with grip, eye protection, stable footwear, and a hand saw sheath; use a helmet if working from a ladder higher than one step.
- Cut order rule: work from top to bottom and from the outside of the canopy inward to maintain structure and visibility.
- Debris and follow-up: decide whether to haul, chip, or quarantine removed material if disease is suspected; plan a follow-up inspection in 6 to 12 months.
8-step DIY workflow (typical small tree, estimated times)
- Quick recon – 5 to 10 minutes: walk around the tree, photograph defects, identify primary objective for the session.
- Staging and barriers – 5 minutes: set the work area, move cars, rope off the immediate drop zone, and place tools in reach.
- Tool prep – 5 minutes: sharpen or align a pruner or lopper, oil pivot points if sticky, and confirm saw teeth are clean.
- Sanitation setup – 2 minutes: ready alcohol wipes and a trash bag for used wipes; isolate any infected debris.
- Cut sequence – 30 to 60 minutes: remove deadwood first, then thin congested crossings, then perform selective reductions to strong laterals using the three-cut approach on larger limbs.
- Inspect wounds – 5 minutes: confirm cuts are at the collar and not flush; trim any ragged edges with a clean saw or pruner.
- Clean up and dispose – 15 to 30 minutes: remove chips away from the trunk when disease is present; stack healthy material for municipal pickup or wood use.
- Final check and record – 5 minutes: photograph the result, note any areas that need monitoring, and schedule a follow-up for heavy reductions staged across seasons.
Practical insight and trade-off: spending an extra 15 minutes on assessment and staging usually saves multiple hours correcting poor cuts later. The trade-off is slower initial work in exchange for fewer rework visits and lower long-term maintenance.
Concrete example: A homeowner pruning a 15 foot crabapple followed this workflow. The crew spent 10 minutes photographing cankers and then discovered a localized fire blight lesion. They confined cuts to the infected area, disinfected between cuts, and halted further shaping until a short diagnostic confirmed treatment was sufficient. The targeted approach avoided unnecessary large wounds and prevented obvious spread.
Final judgment: use this checklist for controlled, small-scale pruning only. If any step produces uncertainty about safety or tree stability, escalate early. Correct timing, a slow methodical workflow, and conservative cutting save trees and reduce future risk.
0 Comments