

Planning Tree Removal in Your Area: Permits, Safety Checklist and How to Compare Contractors
If you are planning tree removal in your area, the job is rarely just cutting and hauling. This guide gives a step-by-step framework to decide whether a tree needs removal, secure the right permits, run a practical safety checklist, and compare contractors so you avoid liability, hidden costs, and delays. Read on for checklists, interview questions to use with bids, and the day-of actions that actually keep a job safe and on budget.
1. Confirm Whether Removal Is Necessary and Explore Alternatives
Start here: removal is a last resort. Many trees that look unsafe can be stabilized or improved with targeted work; removal is the right choice when the tree is an imminent hazard, actively dying with structural failure, or presenting irreversible pest or root problems.
Diagnostic checklist to decide if removal is justified
- Structural failure: major trunk cracks, split unions, or root plate heave visible at the root flare.
- Rapid decline: whole-crown dieback over a single season or confirmed invasive pests such as emerald ash borer or oak wilt.
- Unsafe lean: new, worsening lean toward structures with exposed or shredded roots.
- Irreparable decay: large cavities affecting more than 50 percent of the trunk cross-section or signs of internal rot that compromise scaffold limbs.
- Proximity and consequence: tree is close enough to a house, driveway, utility, or playground that failure would cause significant damage or injury.
Key trade-off: removal eliminates long-term risk and future maintenance costs but creates immediate expense, landscape disruption, and potential permit obligations. Alternatives save canopy and soil value but may require ongoing inspections and repeat work.
Practical alternatives and when they work
- Corrective pruning: reduces weight and failure risk on compromised limbs – good for localized defects but not for trees with widespread decay.
- Cabling and bracing: stabilizes weak unions on mature trees – a maintenance solution, not a permanent fix, and it increases long term inspection needs.
- Targeted pest or disease treatment: effective for early infestations; once mortality accelerates, treatment is often futile and removal becomes necessary.
- Transplanting or root work: possible for smaller specimens with good access, rarely practical for large established trees.
Concrete Example: A 60 year old ash with confirmed emerald ash borer showed 40 percent crown thinning and brittle branches. In this case removal was the practical recommendation because decline is rapid, failure risk to a nearby garage was high, and treatment would not reliably prevent collapse. Conversely, a 30 year old maple with localized branch dieback responded to a two stage pruning and a follow up health plan.
Real-world limitation: many homeowners assume pruning fixes a dangerous root failure; it does not. If roots or the root flare are compromised, removal is often the only safe option. Expect a certified arborist to inspect the root collar and, if needed, use resistograph or sounding tests when decay is suspected.
Judgment you will not hear often: if a tree is marginal but not imminently dangerous, short term pruning plus a monitoring schedule is usually better than immediate removal. Premature removals are common because people overestimate risk; prudent risk management pairs immediate hazard mitigation with a follow up health plan.

2. How to Find and Secure Any Required Permits in Your Area
Start with the jurisdiction, not the tree. Your property may be subject to city, county, state, or HOA rules – each can have different thresholds and requirements for tree removal in a given location. Call your local planning or public works office and be ready with the property parcel number.
Common permit triggers to look for. Municipal triggers include DBH (diameter at breast height) thresholds, designated or heritage species, trees in the public right of way, work within protected zones, and removals that require heavy equipment or road closures. Stump grinding often does not need a permit, but removal of the standing trunk frequently does.
Tradeoff to accept up front. Permits add time and fees, but skipping them risks fines, stop work orders, or forced mitigation replanting – which usually costs more than the permit. If speed is the priority, budget for emergency permit fees and document the hazard thoroughly; expect closer scrutiny later.
Practical steps to find and secure the permit
- Identify jurisdiction: Use your parcel number to confirm whether city or county issues tree permits.
- Search official resources: Look for keywords tree permit, protected tree, or heritage tree on the municipal website. For an example of how one city lays out rules see City of Seattle tree permit guidance.
- Measure and document: Record
DBH, species, and take clear photos from multiple angles showing the tree and nearby structures. - Confirm application requirements: Some municipalities want a site plan, species list, mitigation plan, or an arborist report for large or contested removals.
- Decide who files: You can submit the application or authorize your contractor. If a contractor pulls the permit, require a copy of the permit and the contractor name on file.
- Submit and track: Pay required fees, note processing times, and schedule inspections if the permit requires one.
Concrete example: A homeowner planning tree removal in Seattle for a 30-inch maple would first check City of Seattle tree permit guidance. In practice that job often needs an arborist report, a mitigation plan with replacement trees, and a 2 to 4 week processing window. Expect the permit to list inspection points and replacement obligations.
Who should pull the permit – pros and cons. Having the contractor pull the permit saves time and ensures the scope on the permit matches the quote, but the homeowner remains legally responsible. Require to see the active permit before work starts and verify insurance and business license on the permit application when possible.
Common misuse and what to watch for. Emergency removal claims are legitimate in real hazards, but some requests get fast-tracked without proper documentation. If the contractor recommends emergency removal to avoid permitting, document the hazard yourself – photos, dated notes, and an independent arborist opinion if feasible.
Check the permit status early. Missing a permit can turn an otherwise routine removal into a costly compliance issue.
DBH and photos, check municipal permit triggers, and either pull the permit yourself or require the contractor to provide the active permit and application number before work begins. For full-service help see Mr Tree Inc. services.3. Pre-Job Safety Checklist Any Homeowner Should Use
Key point: before any saw starts, confirm the job controls that actually prevent things from falling on people or structures. Homeowners who treat removal like a moving day often miss the operational details that determine whether the job is safe or expensive damage later.
Before the crew arrives
Do this early: ask for documents and plans at least 48 hours before work. That gives you time to verify insurance, review the contractor's rigging plan, and contact utility companies if needed. If they cannot produce a plan on short notice, walk away.
- Verify paperwork: current general liability and workers compensation certificates and the contractor's local business license.
- Written rigging plan: method for lowering large limbs, anchor points, and whether a crane or mechanical winch will be used.
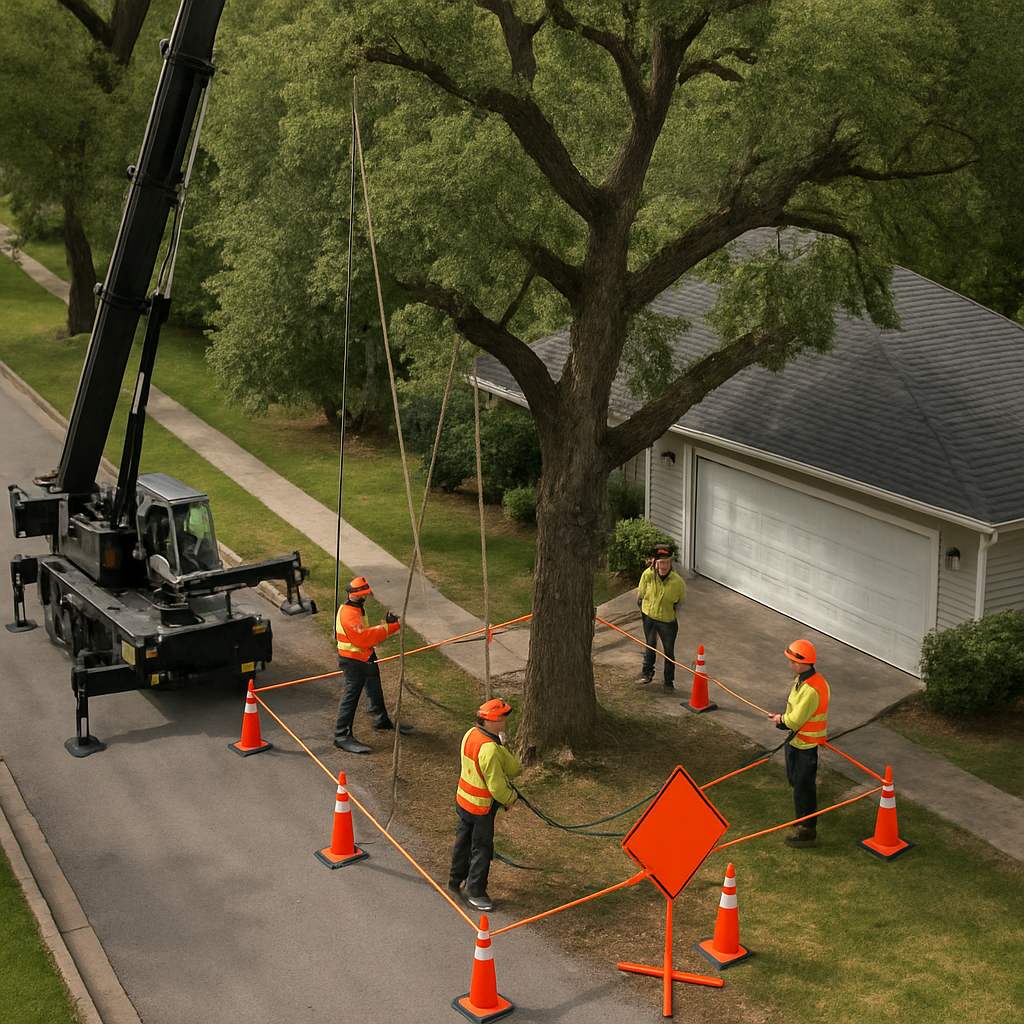
- Exclusion zone dimensions: distance from trunk equal to the height of the tree plus safety buffer, and who will enforce it during work.
- Traffic and pedestrian control: cones, signs, flaggers for work near roads or sidewalks.
- Utility clearances: confirmation that overhead lines are de-energized or cleared by the utility, and plans for any underground work with Call Before You Dig.
- PPE and first aid: crew PPE list (helmets, eye/face protection, chaps, gloves), on-site first aid kit, and a fire extinguisher if a chipper will be used.
- Site protection: how they will protect fences, decking, roofs, irrigation systems, and landscaping during lowering and chipper operations.
- Debris and disposal plan: whether chips stay on site, are hauled away, or used as mulch; stump grinding scope and backfill plan.
Trade-off to understand: stricter controls – full rigging, crane use, traffic control, and stump grinding included – increase cost and time. Those are legitimate costs. Accepting lower bids that skip controls often transfers risk to you in the form of damaged rooflines, crushed irrigation, or an insurance dispute.
Concrete Example: a 60-foot oak leaning toward a garage. The correct approach is a staged removal with a crane or multiple rigging lines, a clearly signed exclusion zone extending beyond the garage edge, and a traffic detour if the crane blocks the street. I have seen crews try one-person drops in similar situations to save time; that often ends in a dented vehicle or costly roof repairs.
- On day-of confirmation: contractor presents the written scope, proof of insurance, and the rigging/traffic plan before any equipment is set.
- Watch for shortcuts: crews arriving without PPE, no barricades, or no plan for lowering large limbs are red flags — stop work immediately.
- Emergency Action Plan (EAP): confirm who calls emergency services, how injured workers will be evacuated, and how powerline incidents will be handled with the utility.
Do not sign final payment until you verify stump grinding, cleanup, and any agreed site repairs are complete and you have disposal receipts if the permit requires them.
4. How to Compare Contractors Objectively
Straight fact: bids will look different because contractors price risk and scope differently. Your job is to normalize estimates so you are comparing the same work, not the same line item total.
What to verify before you consider price
- Insurance and licensing: require a current certificate of general liability and workers compensation; get policy numbers and call the insurer to confirm coverage and effective dates.
- Qualifications: confirm ISA Certified Arborist credentials when tree health assessment or complex rigging is involved and check for local business license.
- Equipment and methods: ensure the estimate lists equipment such as crane, aerial lift, chippers, and whether stump grinding is included or quoted separately.
- Permits and site control: verify who will pull permits and who will provide traffic control, utility coordination, and 811 locates.
Practical insight: certifications and flashy equipment do not substitute for local experience. A certified arborist who has cut similar trees in tight lots is worth a premium over an inexperienced crew using the same saws.
How to normalize bids — a quick method
Create a comparison table with these columns: scope summary, stump included (yes/no), disposal method, traffic/permits included, equipment needed, timeline, payment terms, references, insurance verified (Y/N). Convert each estimate to that template and compare line by line.
| Item | Bid A (low) | Bid B (full scope) |
|---|---|---|
| Tree size / species | 50 ft oak | 50 ft oak |
| Stump grinding | Not included – extra $250 | Included |
| Disposal | Left onsite chips | Haul away & disposal fee included |
| Permits | Owner to arrange | Contractor will secure |
| Insurance verified | No certificate provided | Certificate provided and verified |
Concrete example: a homeowner received a low bid that excluded stump grinding and did not include permit handling. After normalizing, the complete bid was only 12 percent higher; the low bid would have cost more once stump grinding, permit fees, and a second crew visit were added.
- Interview checklist: ask who supervises the crew on site, request three local references for similar work, ask for the make/model of major equipment if crane or lift is proposed, and require a written change order process.
- Red flags: cash only, no written contract, inability to produce current insurance certificates, crews without PPE, unusually low bid with vague scope, or refusal to list subcontractors.
Do not choose a contractor on price alone. Pick the estimate that documents risk transfer, scope clarity, and a restoration plan.
Next consideration: use the comparison template to evaluate emergency response versus planned removal — higher cost can be justified for expedited stabilization, but require a simple written scope and expected follow up work.
5. Typical Cost Drivers and Ballpark Pricing Considerations
Key point: Tree removal in pricing is not one number — it is a stack of independent cost drivers that multiply together: tree size and species, site access, required equipment, disposal, and timing or emergency premiums.
Major cost drivers explained
Tree size and wood density: Height and trunk diameter still matter most. Dense hardwoods and oaks take longer to cut and lower, increasing labor and equipment time compared with softwoods of the same size.
Access and complexity: Tight yards, overhead powerlines, narrow gates, fences and proximity to structures can change a routine removal into a precision job that needs rigging, blocking, or a crane — expect a big jump in price for those constraints.
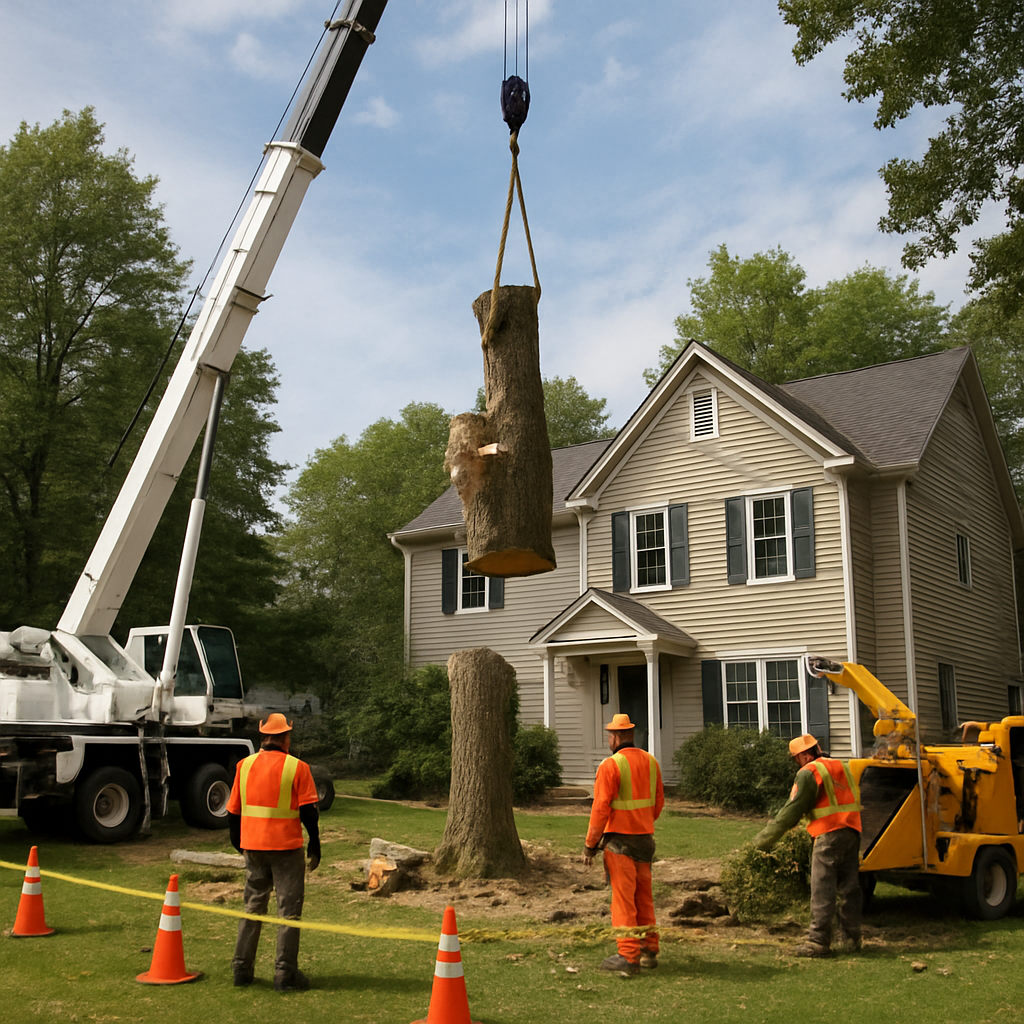
Equipment and crew: If crews need a crane, aerial lift, or traffic control, those line items show up separately. A crane job can multiply the base cost by 2x–5x depending on lift time and setup complexity.
Waste handling and stump work: Stump grinding, chip hauling, and disposal fees are commonly quoted separately. A low bid that excludes stump grinding or off-site disposal is almost always incomplete.
Timing and safety premiums: Emergency tree removal after a storm or on short notice can add 30%–150% to cost. Work near energized lines also carries specialist crew premiums and utility coordination fees.
| Typical job type | Ballpark price range (USD) |
|---|---|
| Small yard tree (<30 ft) | $200 – $800 |
| Mid-size (30 – 60 ft) | $800 – $2,000 |
| Large tree (>60 ft) without crane | $2,000 – $6,000 |
| Large tree with crane or complex rigging | $3,000 – $15,000+ |
| Stump grinding | $100 – $600 |
| Emergency response / overnight | Add 30% – 150% premium |
Concrete example: A 50-foot oak pressed tight to a two-story house with a driveway access point usually falls in the $1,500–$4,000 range because of careful rigging, a multi-person crew, and bulky wood disposal. If the same oak requires a crane because backyard access is impossible, the job can jump into the $6,000–$10,000 band.
Practical trade-off: Paying more for experienced crews and proper rigging reduces risk to structures and saves money on repair claims. Cheap, fast bids can look attractive but often push hidden costs to homeowners via property damage, incomplete cleanup, or additional trips.
How to compare line items: Ask bidders to break out unit costs for cutting, lowering, stump grinding, chip removal, crane time, and permit handling. That makes apples-to-apples comparison possible and exposes omissions.
Cost-reduction moves that work: Combine multiple trees into one scheduled visit, clear access points and vehicles yourself, accept chips left on-site for mulch rather than hauling away, and schedule non-emergency removals during regular business hours.
Final judgment: Budget conservatively. If you see a very low bid, assume important services are missing. Always confirm crane, traffic control, stump grinding, and disposal are included in writing before you schedule work.
6. Day Of Removal and Post Removal Checklist
Immediate reality check: the day of removal converts paperwork and estimates into risk and liability. Be present or assign a decision-maker, confirm the written scope one last time, and treat the contractor's arrival as the start of the contract performance audit — not a social visit.
Day-of practical actions
- Be the point person or name one: give the crew a single on-site contact and a cell number so questions or unexpected conditions get resolved quickly.
- Confirm documentation on arrival: check current insurance certificates, the permit (if required), and the written estimate/contract before work starts.
- Clear the work area: move vehicles, garden furniture, play equipment, and secure pets well outside the exclusion zone.
- Utilities and markings: verify utilities are marked if digging or root work is planned — use Call 811 beforehand and confirm markings remain visible.
- Set expectations for chips and wood: confirm whether chips stay on site as mulch, are hauled away, or if logs will be left for homeowner pickup; agree on pile locations to protect lawn.
Concrete Example: a homeowner scheduled a large maple removal requiring a crane. They required the crew to place chips on the driveway rather than the lawn and to leave logs on the edge of the property for pickup. Because they checked the insurance certificate on arrival and confirmed the crane lift plan, unexpectedly weak soil conditions were flagged and the crew adjusted the approach without delay, avoiding damage to the lawn.
What to verify before signing off
- Stump and root work done as specified: if
stump grindingwas in the contract, confirm depth and that the stump area is backfilled or left as agreed. - Cleanup standard met: chips moved or distributed per agreement, debris hauled away, and no hidden cut branches left under shrubs or fences.
- Damage inspection and photos: walk the site with the crew lead, take time-stamped photos of structures, hardscape, and the cleaned area, and have the crew sign a completion note.
- Disposal documentation: ask for receipts or manifests if the permit required reporting disposal or if municipal rules control green waste.
- Change orders recorded: any deviations from the original scope must be documented, priced, and signed before you pay for them.
Trade-offs and limits: leaving chips on site saves hauling costs but can suffocate turf if piled deeply and may cause temporary nitrogen drawdown; spread chips thin (1–2 inches) or use as mulch beds. Likewise, grinding deeper to remove roots is more expensive but reduces regrowth and makes replanting easier — choose based on whether you plan to replant quickly or want minimal long-term maintenance.
Do not accept verbal assurances at the truck. Get completion in writing and photographs; disposal receipts and a signed completion note are your proof for permits and insurance claims.
Final takeaway: insist on documentation, a short retainage, and clear direction for chips/logs. If you want full-service follow-through or help with replanting and soil restoration, see Mr Tree Inc. tree removal services and services overview.
7. Emergency Tree Removal Protocol
Immediate priority: secure life and property first, then document. If anyone is injured or a tree is in contact with a powerline, call emergency services and the utility company before any contractor arrives. Photograph the scene from multiple angles for insurance and permit follow-up.
Emergency triage: stabilize, salvage, or remove
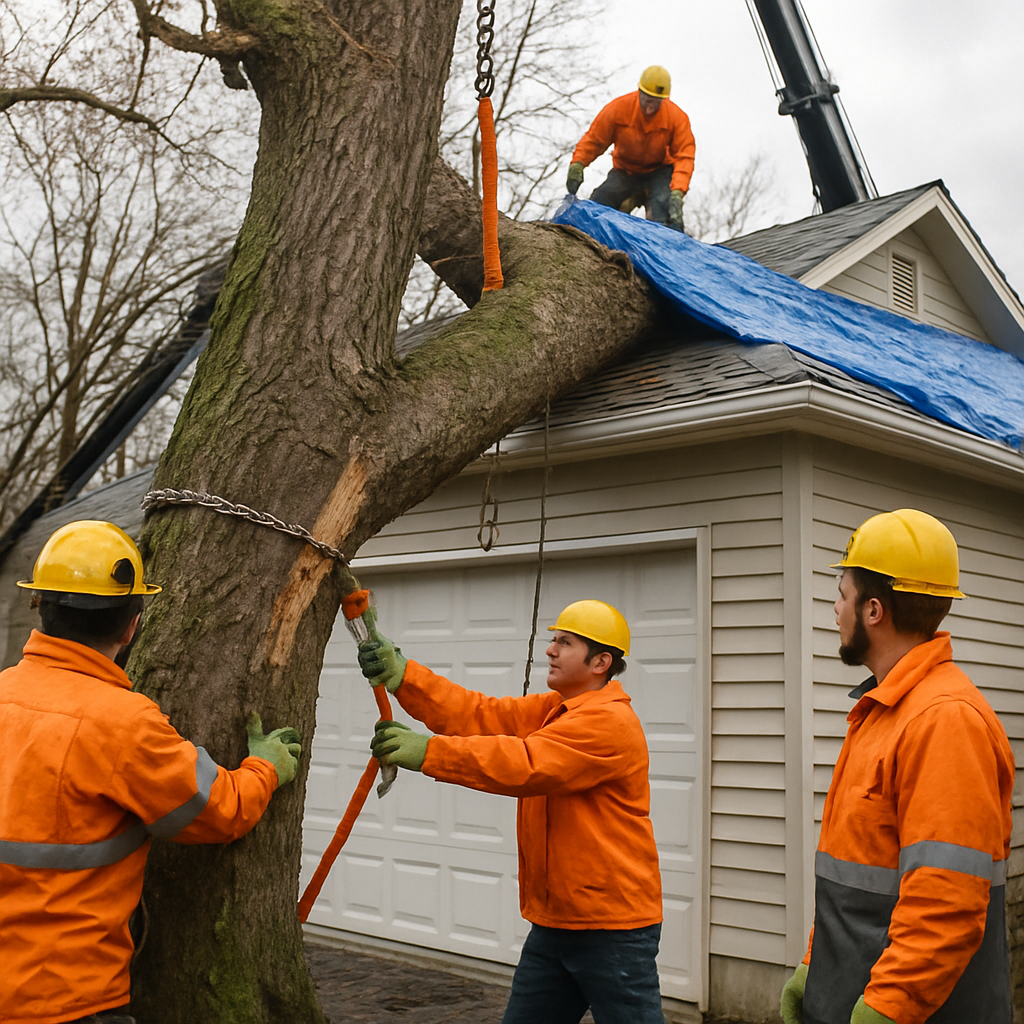
Triage rule of thumb: if the tree poses imminent collapse onto a structure or road, remove hazard sections immediately; if only partially failed and can be stabilized, temporary bracing or guying can buy time for a safer, planned removal. Stabilization reduces risk but often increases total cost because it requires specialist rigging and a second visit for final removal.
- Check for live hazards: energized lines, leaking gas, or structural collapse risk — call utility or emergency services first.
- Document for insurance: photos, time stamps, and short notes on damage cause; insurers often request this before payment.
- Short vetting script for emergency calls: request current liability insurance limits, whether the crew is ISA certified or experienced with hazardous removals, estimated response time, and whether they will tarp/secure property after work.
- Containment and access: clear a staging area for crews and equipment, move vehicles, and keep neighbors and pets back behind the exclusion zone the crew sets up.
Fast vetting matters: in emergencies you will accept an expedited timeline, not an unknown crew. Ask for a certificate of insurance to be emailed or texted before crews start; if a company refuses, walk away. In practice, reputable companies will interrupt scheduled work for true emergencies and provide a clear scope for immediate stabilization versus full removal.
What to expect and what to defer
Expect limited scope on the first visit: most emergency responses focus on hazard abatement — cutting hanging limbs, shoring a cracked trunk, clearing roadways. Full cleanup, stump grinding, and regrading are usually scheduled later. Insist on a written follow-up plan and cost estimate for the remaining work before final payment.
Trade-off to accept: speed versus completeness. Quick removal limits further property damage but increases cost and can leave a messy site. Waiting for a full permit and negotiated quote can save money but risks progressive collapse or secondary damage during storms.
Insurance and permits: notify your insurer promptly; many municipalities allow emergency work to proceed with retroactive permits, but you must document why removal was immediate. Check local rules and keep receipts — use Call Before You Dig if any ground work will follow, and refer to OSHA guidance for contractor safety expectations at https://www.osha.gov/.
Concrete example: during a windstorm a 60-foot oak dropped a large limb across a detached garage roof. The owner called the utility to verify lines were dead, photographed the damage, then contacted an insured emergency tree removal crew. The crew stabilized remaining live canopy, removed the immediate hazard, tarped the roof, and returned two days later with a crane for controlled felling and stump grinding once permits were confirmed and an insurance adjuster inspected.
Key takeaway: act fast on safety and documentation, but require proof of insurance and a written follow-up plan — speed is essential, but sloppy vendors create long-term cost and liability.
8. Appendix: Practical Tools You Can Use Right Now
Ready-to-use tools: below are copyable templates, a simple scoring rubric, and a printable day-of checklist you can paste into emails, print for site visits, or attach to permit applications.
Contractor comparison template (paste and use)
- Business name:
- License / local business number:
- General liability limits / certificate expiration:
- Workers compensation carrier:
- ISA Certified Arborist: (name and certificate number)
- Years in business / crew experience:
- Equipment on site: (bucket truck, crane, chipper, stump grinder)
- Scope of work (detailed): (tree species, trunk diameter, removal method, lowering plan)
- Stump grinding included: Yes/No (depth / backfill agreement)
- Debris handling: chip to homeowner / haul away / landfill (costs)
- Permit responsibility: contractor will obtain / homeowner obtains
- Timeline: start date and estimated completion
- Estimated price (line items):
- References: 3 local jobs with contact info
- Red flags observed: (no PPE, cash-only, no contract)
Practical insight: Don't treat this as a bureaucracy exercise. Use the template to force bidders into the same format so you can compare line items. A cheaper bid that leaves several fields blank is not a bargain — it is an unknown cost.
| Criteria | Weight | Max points |
|---|---|---|
| Insurance and license verification | 25 | 25 |
| Written estimate completeness | 20 | 20 |
| Safety practice and PPE visible | 15 | 15 |
| ISA arborist or equivalent | 15 | 15 |
| References and similar job experience | 15 | 15 |
| Price reasonableness (not lowest) | 10 | 10 |
Concrete example: Two bids arrive. Bid A is 30 percent cheaper but lacks a written disposal plan and shows no ISA arborist. Bid B is higher but includes stump grinding, proof of insurance, and three local references. Using the rubric, Bid B scores clearly higher; you accept the higher cost because the risk and likely hidden fees on Bid A exceed the savings.
Permit application checklist (copyable fields)
- Property parcel number and owner name:
- Site address and map/GIS link:
- Photos: full-tree, trunk close-up, root flare, and surroundings
- Species and DBH: include measurement method at 4.5 feet
- Reason for removal: hazard, disease, utility conflict, etc.
- Contractor details: business name, license, insurance certificate
- Mitigation / replacement plan: species, size, location or fee-in-lieu
- Sketch or site plan: show tree location relative to structures and right-of-way
- Permit fee payment method: check accepted forms
- Signature and date: property owner or authorized agent
Limitation to note: Municipal forms and required attachments vary. Use this checklist as a baseline, then check your city site — for example see the City of Seattle permit guidance at Seattle trees — or call planning directly. If digging is involved, always contact Call Before You Dig.
Printable day-of and safety checklist
- Pre-arrival: notify neighbors, move vehicles, secure pets
- Documentation on site: contractor insurance certificate, permit (if required), written estimate
- Utilities checked: overhead clearances confirmed, 811 ticket if digging
- Exclusion zone: cones, tape, and a competent person managing access
- Observed PPE and controls: helmets, eye and ear protection, chainsaw chaps, rigging hardware
- Chipper and wood storage: chipper placement away from structures; agreed chip disposition
- Post-job sign-off: receipt for disposal, confirmation of stump grinding depth, photos of site, final invoice
Key judgment: Use the scoring rubric to eliminate low-ball offers quickly. Prioritize verified insurance and a complete written scope over the lowest price.
Next consideration: put these tools on your phone or print them before you call contractors. If you prefer a full-service option or an ISA consultation, see Mr Tree Inc. services and tree removal.
0 Comments